
Don't you love it when your Illustrations come to life. Bellow you will find all the steps you need for making a simple animation of your own.

- Step 1: Pick an image or drawing you would like to come to life, upload it to a free on line photo editor. I love PicMonkey and used it for this tutorial.

- Step 2: When you have uploaded the image it will look like the above picture. In the left column in the fourth box down you will see a box called overlays, click on it to open.

- Step3: There are lots of fun free overlays in PicMonkey for you to make some very simple animations or you may even choose your own images as overlays.
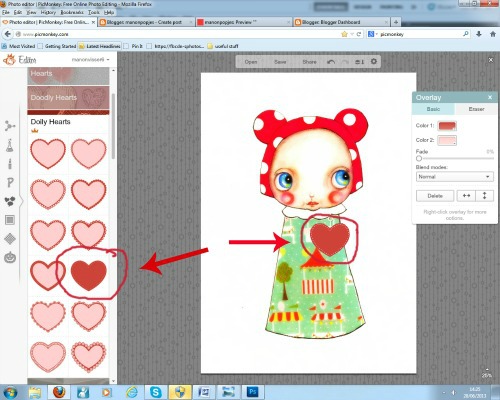
- Step4: I have chosen a heart to bring my illustration to life but be creative there are many more free overlays to keep you going for a good while.

- Step5: When you are done with you first image you need to save it to your computer, go to the second top button.
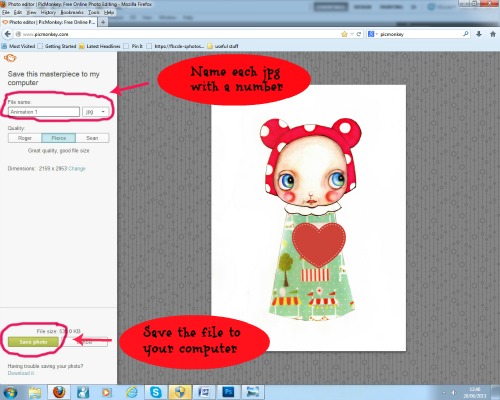
- Step6: When you have clicked on the save button it will bring you to the above page. Name your first image with number 1 so you can easily find the sequince for your Gif animation at a later stage. When your image is named and numbered save it to your computer.

- Step7: Now we are ready for the next stage. We are going to work on the second image and for us to do that we need to go back a step. Click on cancel. Now you will see the image from earlier.

- Step 8: So when you have your previous image in front of you on your screen you are ready for the next movement of your animation. You can either slightly change the size, position or the colour of the heart. Then repeat steps 5 to 8 as many times as you like in order to create enough movement for your animation to come to life. Saving each image to your computer.

- Step 9; When you have enough images you are ready to make a Animated Gif. I have chosen the free Picasion Gif maker. You can find it here. There is space for op to 10 images. You can play with the speed and size but be careful once you have chosen and clicked create and you are not happy you will have to start uploading all your images again.
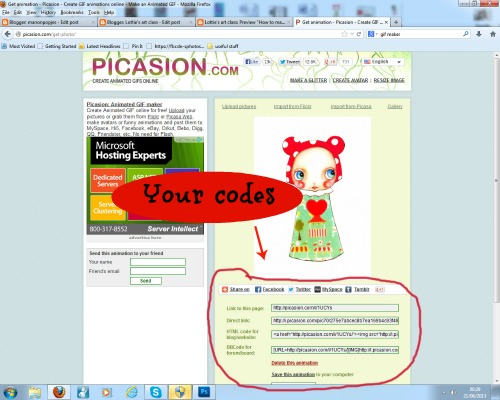
- Step 10: is the best fun part of the process. This is where you will see your animation and where you can collect your HTML code to use for your blogpost.
Have fun! Please leave me some feedback it keeps me motivated so more free tutorials will come.
I had always wondered how the animation was done. Thank you for the tutorial. Blessings!
ReplyDeleteThanks for sharing Manon! So kind of you.
ReplyDeleteOh my!!! I did this and it worked!!! Thank you so much for this tutorial, I get so fumbly on the computer and you made this a breeze! I use Picmonkey a lot but didn't know about Picasion, You are super cool, so keep making those tutorials :) Michelle
ReplyDeleteHi Manon, woohoo thx for the link to picasion i was still using some way old program, or rather i was not using it because it was a kind of hassle.
ReplyDeleteWow! Your animation looks great! Must try one for myself! Thank you so much!
ReplyDelete